
Guided Hands®
How To Use Guided Hands®

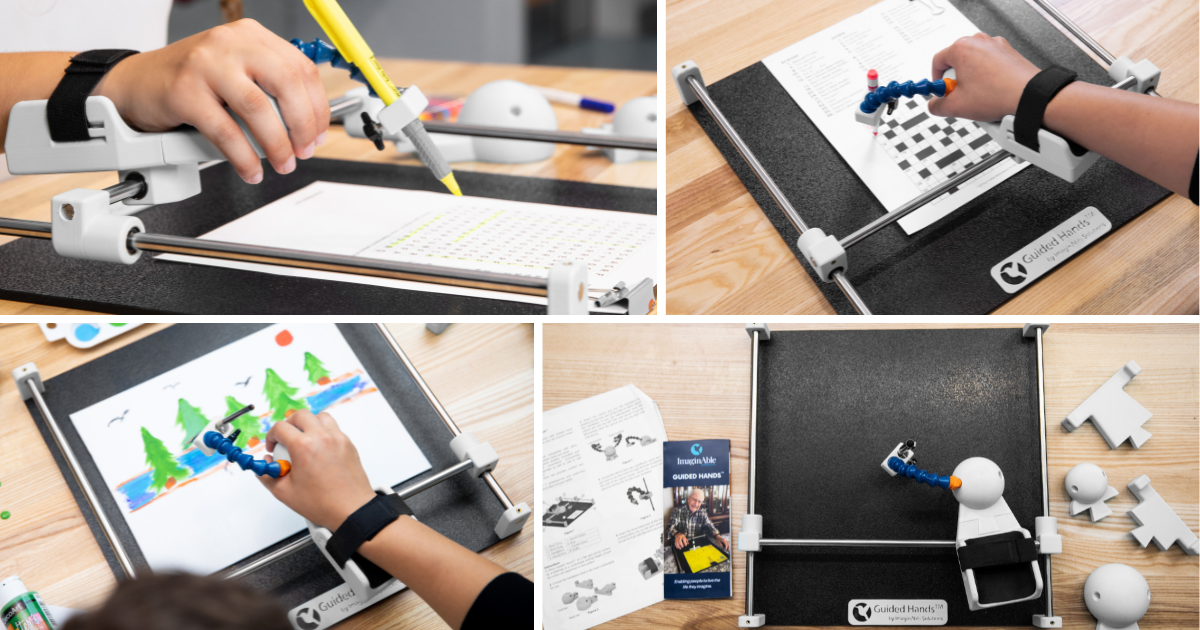
About Our Handpieces

Spherical Handpiece
The spherical handpieces are designed for individuals who are able to rest their hand on a ball-shaped object with minimal grasping efforts.

Joystick Handpiece
The joystick handpieces are designed for individuals who have difficulty with pronation and prefer a neutral grip. It’s also perfect for practicing joystick movements needed for wheelchair use. Product may not be compatible with purchases before March 2024.

Flat Handpiece
The flat handpieces are designed for individuals who have spasticity in their hands to allow the fingers to curl under the handpiece.
Guided Hands® is an Apple approved, third-party assistive technology for people with limited mobility.
Frequently Asked Questions
Wondering if Guided Hands® is the right fit? Click here:
Q: How do I know Guided Hands® is the right fit for me?
A: Guided Hands® is suitable for users who have high or low muscle tone in their hands and are able to stretch out their elbow slightly in front of them.
Q: Can people with tremors use Guided Hands®?
A: The device typically works best for patients with slight tremors as our sliding system is near frictionless and does not dampen hand movements. We are aiming to integrate stabilization technology into our next version of Guided Hands® to support users with tremors.
Q: Can Guided Hands® be used with a wheelchair tray?
A: Yes! Please ensure that the entire device (which is 15 in x 15 in) is on the tray to prevent it from falling and harming the user. We also encourage someone to be present to ensure that it does not fall off the tray, however, there are rubber feet located at the bottom of the board to prevent sliding.
Q: Can someone who has weak shoulder muscles still use Guided Hands®?
A: Yes, Guided Hands® is suitable for users with both high and low muscle tone in their hands and arms! Users have found that Guided Hands® feels more comfortable for people with weak shoulder muscles when their elbow is resting on the table and the device is at an incline. It can be inclined by placing a slant board, binder or book beneath the device. There are rectangular rubber pieces as well as rubber feet located at the bottom and underneath the board that prevent it from sliding into the user’s lap.
Questions about purchasing? Click here:
Q: How do I choose what hand piece design is best?
A: Guided Hands® comes with 6 handpieces, 2 spherical, 2 joystick and 2 flat handpieces for different levels of hand impairment and sizing that accommodates small, medium and large hands.
Q: Can my insurance pay for Guided Hands®?
A: It depends on your insurance company. We have heard success from individuals who had their health professional or occupational therapist submit a form explaining Guided Hands® being used as a communication device. Please email info@imaginablesolutions.com for more information on funding opportunities and grants that may be applicable to you. In Ontario, Canada, the device is covered under respite and passport funding.
Q: Is there a return period after purchase in the event the person does not like it or has trouble using it?
A: We provide a 15-day full refund and 90-day warranty for Guided Hands®.
Q: Will you accept tax-exemption status?
A: Yes, provided the correct tax-exempt certificate paperwork.
Q: Do you accept payment via check?
A: Yes, we do! However, the device is shipped out once we receive the payment. Please contact info@imaginablesolutions.com for our mailing information.
Q: Do you have volume pricing?
A: Yes, for further details please contact our team at info@imaginablesolutions.com.
Product Specific Questions. Click here:
Q: Does Guided Hands® require any batteries, wifi or electricity?
A: Guided Hands® is purely mechanical and has no electrical components and does not require any additional items to operate. Just pick it up and go!
Q: Is the device ambidextrous?
Yes, Guided Hands® can be adapted for both left and right dominant hands as there are 2 holes where the utensil arm can be inserted in each handpiece. If you are left-handed, insert the utensil arm on the right side. If you are right-handed, insert the utensil arm on the left side.
Q: Is there a learning curve when using Guided Hands®?
A: Yes, similar to learning how to write for the first time, using Guided Hands® requires practice and helps users develop sensory and cognitive skills along the way. We provide the Guided Hands® Worksheet Package to help teach individuals how to use Guided Hands® and become familiar with the mechanics and movements of the device.
Q: Can I schedule a one-on-one instructional call with someone from your team to ensure we are using it properly?
A: Yes! We provide free 30 minute demonstrations! Book your demo here or watch our instructional video.
Q: Where can I find a demo unit?
A: To find a Guided Hands® near you visit our Trial a Guided Hands Near You page or Contact Us
Guided Hands® best practices. Click here:
Q: What stylus is recommended to use with Guided Hands®?
A: The best option is the Apple Pencil, as it offers the highest precision and compatibility with iPads. That said, we also recommend using a simple stylus pen with a stylus tip at the end, which works well for the majority of iPads. Keep in mind that older iPads may not have the same level of screen sensitivity for stylus use as newer models. If you’re using a stylus on an iPad, we suggest going into the device settings and adjusting the AssistiveTouch settings to help improve screen sensitivity.
Q: How can I secure the device if my loved one has spastic arm movements?
A: To keep Guided Hands® stable, we recommend securing it to the table with a clamp or a suction cup. For added convenience, suction cups are included in our Adaptations Kit.
Q: Can I adapt the device to be used as an arm support?
A: Yes, you can rest your wrist on the flat handpiece and secure the strap over the forearm. This allows users to hold the utensil in their own hand while leveraging the frictionless sliding system provided by Guided Hands®. Watch how to use our adaptations kit here.
Q: How do I secure my notebook or paper so it doesn’t shift when I use Guided Hands®?
A: We recommend securing papers to the baseboard with a binder clip or tape to prevent movement. For added convenience, a binder clip is included in our Adaptations Kit.
Q: How should I place my paper or iPad on the black base of the device?
We recommend placing the paper on the upper left slide of the baseboard if the user is right-handed or on the upper right side of the board if the user is left-handed to ensure you have the largest area to work with.